
Issue 7 of Home / Life magazine is out now and it is full of summer inspiration for the coming months.

If you’ve been following me for a while, it won’t really come as much of a surprise when I tell you that one of my favourite colour palettes for interior styling is neutrals. From earthy greens and taupes through to classic white - this palette feels contemporary, sophisticated and beautifully understated. I like a little subtlety in my interiors and this colour palette is classic without being too obvious and it works beautifully against a white background, as the muddy earthy colours can really stay true.
Head to the Lottie Lifestyle blog for my tips on creating a beautiful neutral colour palette for your home.
]]>
The latest issue of Home / Life magazine celebrates Chinese New Year with pretty table styling and some authentic Chinese dishes to help you celebrate at home with friends and family. Take a look at how one Dutch family have created a home away from home in Singapore and read about the expat experience during the pandemic. Plus there is gorgeous denim fashion, health and wellness and homewares to keep you inspired.
Read the latest issue of Home / Life magazine here
]]>

The latest issue of the Home / Life magazine is all about Christmas. A beautiful collection of articles to help you plan for Christmas this year - from where to buy a tree, which butchers and providores have you covered for festive food, a round up of beautiful wreaths to buy, wrapping gift ideas plus entertaining and styling inspiration.

Meet Olivia Thorpe - Owner and Founder of Vanderohe the organic skincare brand that has gained a cult following amongst beauty editors, make up artists and everyday women (and men!) from around the world in three short years.
I first met Olivia at the beginning of the Vanderohe journey in 2017. I was working as a stylist and photographer at the time and Olivia and I met one day in Tiong Bahru over coffee and cakes to discuss her new skincare venture. (I remember this day so clearly because I turned up extremely embarrassed with a completely sunburnt face having accidentally forgotten to apply suncream the day before). I was somewhat mortified to sit there with the lovely dewy-skinned Olivia while she told me all about the importance of taking care of our skin. Umm, yes.

Olivia’s path to launching Vanderohe has a common thread to other entrepreneur stories. Having graduated from university, Olivia took up a position working in an investment bank in her native London. With a move to Singapore a few years later, Olivia began to re-think her previous corporate life and was interested in exploring a more creative pursuit. She started an online beauty publication - Vanderohe - and began a deep dive into the world of the beauty industry. It was during this time that Olivia developed allergic dermatitis and couldn’t find a product to soothe her symptoms. And so, started the research that would eventually lead to Vanderohe - the brand and range of products that we know today.
It took two years of meticulous research into the chemistry of organic plant oils and seeking out organic producers and tracing the efficacy of the raw ingredients to their native countries, to produce an oil serum that would truly nourish the skin. At her home in Singapore she started to create blends - testing them on herself and passing them on to friends to try. The results were immediate and overwhelming.

Within the first year of launch, Vanderohe’s No. 1 Nourishing Face Serum secured six leading awards - from British Vogue to Harpers Bazaar Singapore - which lay the foundation for expanding the range in 2018 with four further award-winning products. Vanderohe quickly went from strength to strength receiving emphatic praise from respected influencers, celebrities and the world’s top beauty press - as well as a legion of dedicated everyday users - myself included.

At the heart of all that Olivia does is a dedication to quality and integrity. Vanderohe uses only organic or wild-harvested plant oils grown in native soils, 100% cotton and forest-friendly packaging, and donates a proportion of profits to Marine Savers, a leading marine conservation team. Olivia now resides in London with her husband and their three young children and is committed to keeping sustainability and trust at the core of her brand.
I am a true advocate of this brand. Yes, you can now buy my favourite picks from the Vanderohe range of products through my online shop, but I have been using these products for years and buying them for family and friends and converting whoever would listen to me since it launched. Nothing has changed, except that now I can share with you my love for these products through Shop Lottie Lifestyle.
If you have any questions regarding these products, drop me a line. I’d be happy to answer your questions.


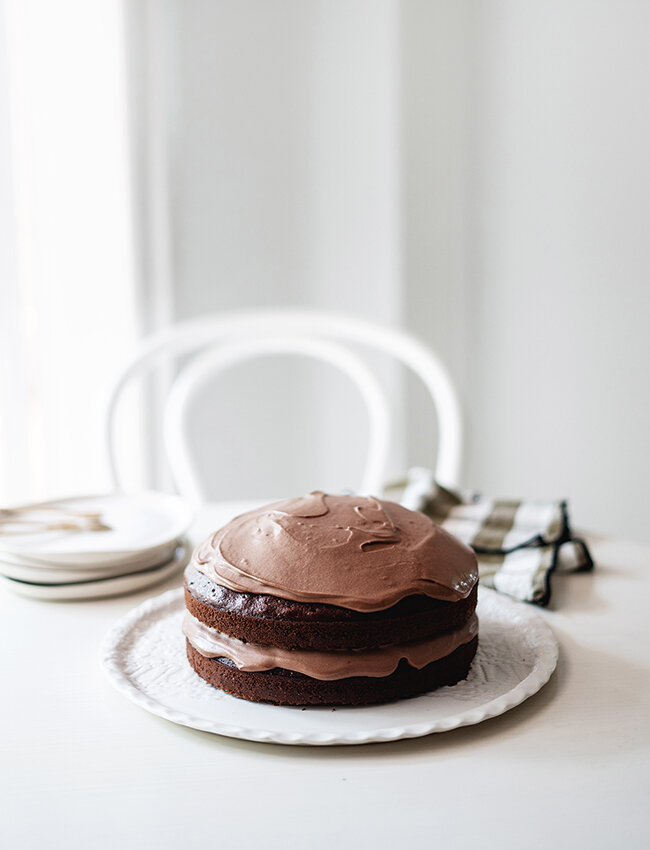
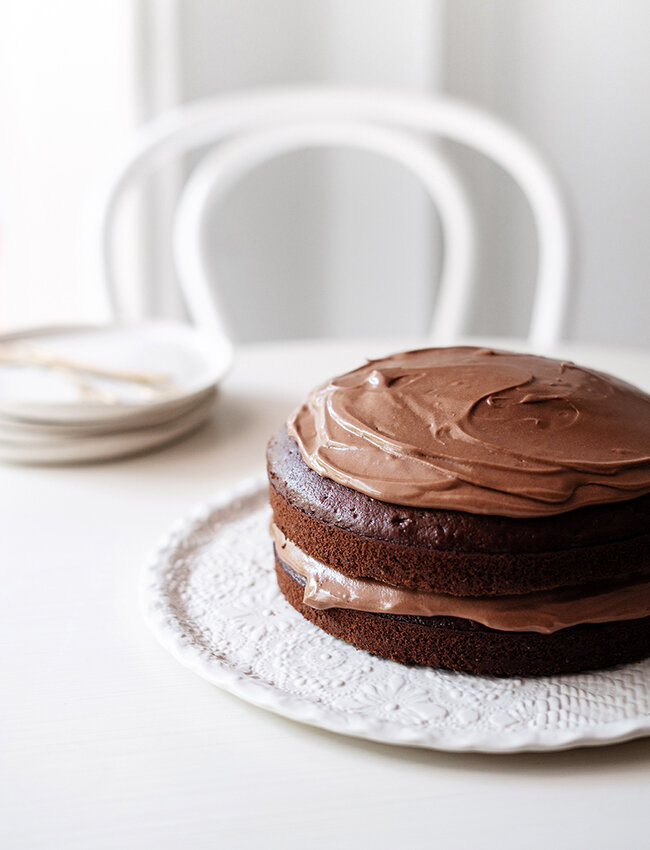
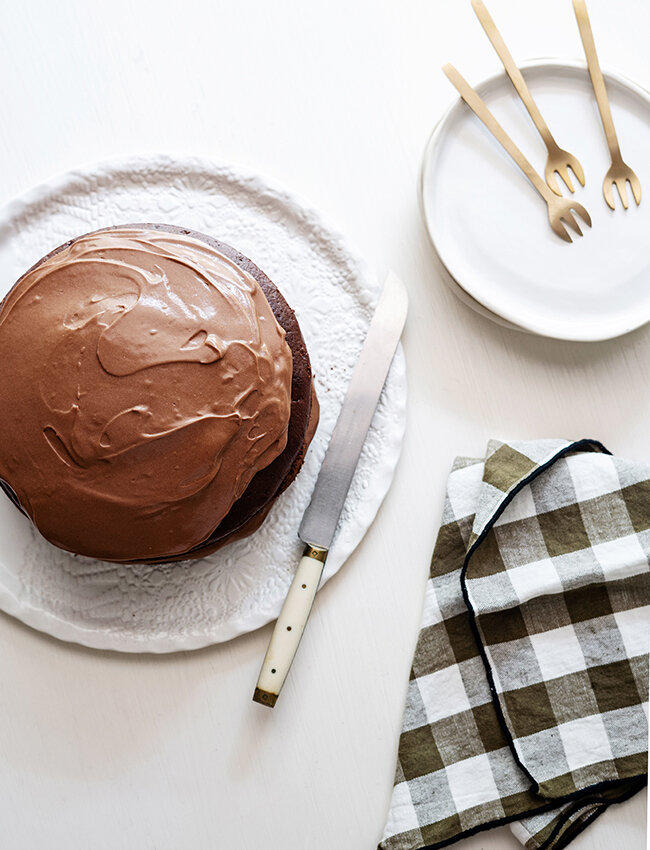
As I write this blog post I may or may not be scoffing a piece of this very cake…for research purposes - obviously. This is seriously the best chocolate cake recipe ever. I feel like I’ve tried and baked a fair few chocolate cakes in my time and this one is perfect. It’s moist, chocolatey, not too sweet and has a lovely texture.
The recipe for this delicious cake is from Simple Cake by Odette Williams and I have to say, since buying this cake book, I have referred to no other. I love how this baking book is laid out and every cake I’ve made has been really really good. In addition, the frostings and topping suggestions are exceptional (this chocolate buttercream is the first one I have ever made and actually liked). It’s the kind of book that you buy and then wonder what on earth you did before you owned it.


Can you move to a foreign country and bring your interior style with you? What happens when you go from, let’s say, a family sized traditional home in Sydney to a sleek modern condo in Singapore? How do you make that work? Do you leave all your beautiful things in a storage unit in your home country and buy new when you arrive? The answer (should be) a resounding no! And yet I know so many expats who feel that because they’ve moved from one type of home in one country to another in their new place of residence they need a whole new look. Today’s home tour shows you why you can always make it work and why bringing your beautiful belongings with you is exactly what you should do.


In the heart of Palma, Mallorca on a narrow residential street, an unassuming building houses a sunny studio space where the most extraordinary vintage textiles are being transformed into beautiful pieces for the home. This is espanyolet - a creative design studio run by Melissa Rosenbauer and Thomas Bossert. Dividing their time between Berlin and Palma, Melissa and Thomas are passionate creatives and makers, taking humble fabrics and coaxing them through a process of hand dying, drying and finally stitching to create one-off pieces for the home that, for me, define the idea of luxury.

The process for creating these one-of-a-kind textile pieces starts with a sourcing trip in Europe. Melissa and Thomas travel across Europe from Hungary to Romania, Germany and Spain to unearth antique fabrics woven of linen, hemp or cotton. These fabrics are sourced in their original state with imperfections, stitching, patches and embroidery in tact. Loomed in the 1920’s according to local traditions and washed hundreds of times throughout their long lives, each piece tells a story.

espanyolet’s approach to transforming these fabrics into beautiful bespoke pieces for our modern homes is one of respect. They employ a slow design philosophy that pays homage to colour and texture with all of their pieces hand painted or hand-dyed using special techniques developed in their studio. Nothing is rushed, there is no mass production and no two pieces will ever be the same. The result is a small range of beautiful textile products that have a rich, layered and textured depth.

In creating the first Shop Lottie Lifestyle range of espanyolet textiles, I met with Melissa and Thomas in Mallorca to visit their studio and discuss all things fabrics and colour. It was such a joy. The result is a range of cushions in three sizes created from a single piece of antique linen and painted in a spectrum of plums, dusty pinks - through to burnt oranges. Each cushion has a unique ombre finish and is a one-off. Each collection I create with espanyolet will be different from the next.

If you would like to have a range of espanyolet textiles made bespoke for you, then get in touch with us and we can work with you on colours, textures and size requirements.

IMAGE CREDITS: LEAD IMAGE, PERNILLA DANIELSSON @LIFESTYLE_MALLORCA | ALL REMAINING IMAGES, LOTTIE LIFESTYLE

Simple additions to the master bedroom can result in a beautiful space in which to slumber. From soft rugs to affordable art I share with you some of my favourite pieces
I’ve decided that it’s high time I made some effort in the bedroom (ahem…obviously I’m referring to the decor!) Seriously though, I don’t think I’ve ever really made an effort to make the master bedroom a truly pulled together space – not since the first home that we bought. From that first proper home we moved to another house (that we thought was going to be our medium long term family home) only to up and move to Hong Kong within a year. In that year I hadn’t decorated the master bedroom as the whole house needed work and everything took priority before our bedroom. Then came our condo living period in Hong Kong where we had zero space to do anything of note and we also never felt settled (each weekend was spent discussing how much longer we would have to live in Hong Kong). I was certainly not creating a ‘home’. And then came Singapore. Our first home in Singapore definitely felt like our first proper home in years and I decorated it as I would do had we owned it. But still I did nothing in our bedroom.
Now I feel like there is no excuse. We will be living in Singapore for the foreseeable (maybe forever) future. We love our new home and I’ve finally decided that maybe it’s about time I made our bedroom feel like it’s permanent. I think this is the point that all expats eventually reach with their homes. Yes, we are not living in a home that we own but we can end up living in the same place for quite a long time and living with temporary decoration actually makes you feel temporary.
I’m not suggesting you invest heavily on items that can’t move with you – but a little effort here or there can make a big difference. The biggest issue I have with the master bedroom is it’s size. It has soaringly high ceilings and is a large square shape. It is hard to fill and I don’t want to unnecessarily buy furniture that in a future home wouldn’t fit in a bedroom. So I have some solutions.
Firstly I am going to ditch the regular bedside tables and go with something long and possibly cantilevered like the image above. I think this will be something that I have made rather than buy. Secondly, I’m thinking of having a large mirror made – or perhaps trying to find one (I saw one recently in Originals that I liked). And then it will be a matter of some new bedlinen and perhaps a second rug to fill the space.


My two edits are almost identical. The only difference really is the bedlinen. I like to switch things up and if you stick with classic design for some of the pieces then you can easily use two different styles of bedlinen to give your room a different look. And that way I don’t have to choose between my love of soft French stonewashed linen and the crisp whiteness and playful design of my favourite ‘pegboard’ linen from Castle and Things. I also quite like moving art around to suit my mood and smaller pieces are great for that.

1. GEORGE NELSON ‘CIGAR’ WALL SCONCE | 2. SOCIETY OF WANDERERS ‘OLIVE’ FRENCH BEDLINEN | 3. MAJOR MINOR ‘PINSTRIPE’ PILLOWCASE | 4. OLUCE ATOLLO 233 ORO BRASS TABLE LAMP | 5. KERRY ARMSTRONG GIRL BITS #7 GIRL ON WIRE SERIES | 6. TIGMI TRADING BOUJAD RUG | 7. ARMADILLO & CO ‘SIENNA’ RUG IN PUMICE 8. KARA ROSENLUND ‘GHOST GUM’ PHOTOGRAPHIC PRINT

1. GEORGE NELSON ‘CIGAR’ WALL SCONCE | 2. CASTLE AND THINGS ‘CHARCOAL PEGBOARD’ DUVET AND PILLOWCASE, ‘CHARCOAL’ VELVET PILLOWCASE, ‘BUTTERSCOTCH’ LUMBAR CUSHION | 3. OLUCE ATOLLO 233 ORO BRASS TABLE LAMP | 4. KERRY ARMSTRONG GIRL BITS #7 GIRL ON WIRE SERIES | 5. TIGMI TRADING BOUJAD RUG | 6. ARMADILLO & CO ‘SIENNA’ RUG IN PUMICE | 7. CASTLE AND THINGS ‘PINK PRETZEL’ ARTWORK
I also need to reupholster our Jardan bed which was a great classic design buy from a long time ago and just needs a refresh. And maybe consider getting some curtains. We’ll see on that last point.
Photo Credits: Image 1: Design Project Studio MK27 via Urdesignmag.com | Image 2: Benoit Linero for JeanCharles Tomas Interior Architecture | Image 3: societyofwanderers.com | Image 4: Bautier via Architonic.com


When I think of “weekend style” my mind honestly goes blank. Style? on the weekend? Umm…do you mean throw on workout leggings and a t-shirt, scrape your hair into a top knot? No? Huh.
We all fall into easy fashion choices and there is definitely a time and a place for the leggings and t-shirt combo (watching your kids play sport at 8am for instance). But once we step away from the necessary children related activities of the weekend, it would be nice to throw together an outfit that feels comfortable, effortless and stylish.
So I gave a brief to our fashion contributor Delphine - weekend style - what can we wear on the weekend that works for hanging at home, inviting friends over or spending a day playing tourist in our hometown Singapore? It took her mere moments to send me back three gorgeous looks* that had me thinking my weekend style should go up a notch.
It’s all about easy mid length skirts, sandals, a cute handbag and a t-shirt. (Top knot optional).
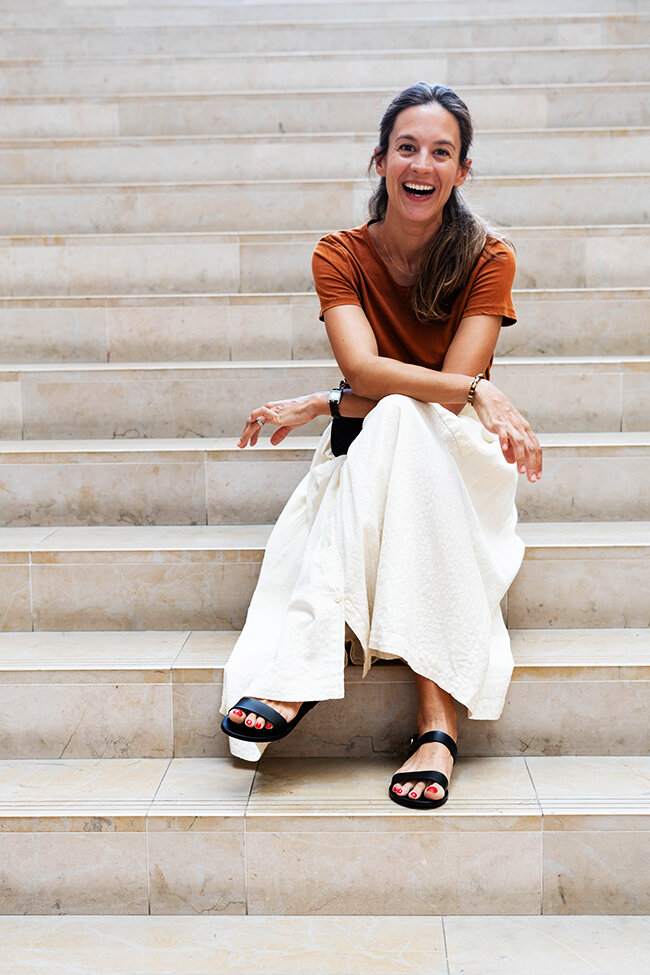


Delphine wears t-shirt Zara | skirt Soeurs | belt bag Clare V | bracelet Gas Bijoux | watch Hermes | Sandals Ancient Greek Sandals
To see the 3 looks Delphine styled, head to the Lottie Lifestyle blog.

This will now be our 11th Chinese New Year whilst living in Asia. Over the years I have started to appreciate and look forward to certain aspects of the various festivals and celebrations of our adopted region and Chinese New Year ticks all the boxes. It really is akin to our own New Year on December 31st - everyone takes time off, the schools close and many people travel to celebrate with family.
I love this time of year. I love seeing all the lion dance troupes bundled in the back of pick up trucks zooming around Singapore with brightly coloured flags flying. Or hearing the drum beat and clang of cymbals and know that around the corner a lion is performing the good luck ritual for a business or home. And one of my all time favourite treats - popular at this time of year - but let’s face it (like hot cross buns) delicious at any time of year, is the pineapple tart.

You will find these delicious little balls of pineapple goodness in all the shops at the moment, but this year I was really keen to learn how to make them myself. So I called up my good friend Angie Ma and said “hey, do you want to come over and show me how to make pineapple tarts..?” Lucky for me (and you!) she said yes.

I first heard of Angie when we lived in Hong Kong. She was a mythical person to me back then - the owner of a secret supper club that lots of my friends were attending. News of this underground secret supper club was spreading but I never had a chance to attend before we left Hong Kong. Fast forward many years later and our paths randomly crossed at a new-parent meet and greet at the school. Angie is one of the most vivacious, ‘can-do’ people I know and she is a passionate foodie. She recently re-established the secret supper club concept right here in Singapore. And it has been an instant hit. Tickets to attend sell out within hours of going online. ‘Once Upon A Secret Supper’ is held every few months and each dinner is themed around a particular cuisine or celebration. The menu is created by Angie and her team of passionate cooks and everything is made from scratch - each dinner is a labour of love and held in a secret private residence. Guests don’t know where the dinner will be held until 24 hours before and they have no idea what they will eat or who they will dine with until they arrive on the night. It’s a great concept.
Anyway, back to pineapple tarts. Turns out these little fruity cuties are actually quite easy to make - and definitely something fun to do with the kids. The folding up of the pastry dough into a perfectly little round ball may take a little patience and a bit of trial and error but you quickly get the hang of it. And the pineapple jam is delicious - in or out of the pastry - so I’m already thinking of other applications for this clove spiked tropical fruit jam.

Recipe by Angie Ma from Once Upon A Secret Supper adapted from Nasi Lamak Lover and Chef in Disguise
Makes about 80-100 pieces
350g butter (room temperature)
100g (5 tablespoons) condensed milk
510g plain flour
2 egg yolks
500g of ripe pineapple flesh (about 1 medium sized pineapple peel and cored)
1 cup of sugar
2 tablespoon of lemon juice
10 cloves
1 egg yolk
1 teaspoon of condensed milk
White sesame seeds for decoration
Put the pineapple chunks into a food processor and pulse until you have a rough puree (you are looking for some texture to the puree as opposed to something completely smooth so go slowly with the food processor and keep pulsing until your get a rough puree). Place the rough pineapple puree and cloves in a saucepan on the stove and stir over a medium heat until most of the liquid has evaporated (approx 10-20 minutes depending how juicy the pineapple is). You want the mixture to be moist but not wet so that it doesn’t make the pastry soggy.
Add the sugar and lemon juice and continue to stir continuously until the filling develops a deep golden colour and is thick and sticky and coats the back of a spoon. (Tip: Put a small plate in the fridge and smear some jam on it to check for the right sticky and jammy consistency, if its not jammy, keep it on the stove a bit longer). Keep stirring and be careful to not let it burn. Taste to see if the filling has achieved the desired sweetness. Take off the heat and allow the pineapple filling to cool to room temperature then place in the fridge for 30 minutes. This will make the filling easier to handle. You can make the filling ahead of time and store it in the refrigerator for up to 1 week. When you are ready to use it, remove the cloves.

Preheat oven to 180°C. Cream the softened butter and condensed milk in an electric mixer. Once combined and creamy add the egg yolks one at a time, beating between each addition. Slowly add the flour, continuing to mix until the mixture becomes crumbly. Turn off the mixer and use your hands to squeeze the crumbly pastry into a ball (this will take a minute or two - at first it will seem too dry and crumbly but as you squeeze and knead it into a ball it will transform into a soft dough).

Once you have a smooth round ball of dough, pinch small amounts of the dough into 10gram pieces (for consistent shape and size weigh each little pinch of dough as you go) and form each piece into a round ball. While you work keep the dough moist under a slightly damp tea towel. Once you have all your little dough balls ready, you can start making the tarts.
Take a little dough ball and place it in your palm. Gently flatten it using your fingers to form it into a round disk about 6cm in diametre. Make the edges of the disk a little bit thinner around the edges so it is easier to curl into a ball. Place approx. 1 teaspoon of pineapple filling on the centre of each pastry disk. To wrap it, pinch opposite ends together and over the pineapple jam in the middle and then do the same with other two opposite ends until you have enclosed the pineapple jam. Gently start rolling the dough between your palms to achieve an even smooth ball.
Place on a lined baking tray and glaze with egg wash and sprinkle a couple of sesame seeds on each ball. Bake for 6-8 minutes or until the pastry is a light golden brown. Transfer to a wire rack and allow to cool completely. Store in air-tight container.
For a gift, put them in an airtight glass jar with some red ribbon for good luck.

That’s it! A delicious and fun treat to make this Chinese New Year. Thanks for sharing the recipe with me Angie! 新年快乐!


ANGIE MA
Founder of ONCE UPON A SECRET SUPPER
It's the lead up to Chinese New Year celebrations which means it is time to make a few batches of these delicious homemade buttery melt-in-the-mouth pineapple tarts for home consumption with the family and also gifting to friends.
My parents grew up in Taiwan so I grew up eating pineapple tarts as our sweet treat for Chinese New Year. Pineapples are considered a particularly auspicious fruit and are thought to bring prosperity, luck and good fortune most likely linked to their lovely gold colour. I love visiting my local wet market Ghim Moh in Singapore and picking out a few sweet ripe pineapples from the mountains of pineapples. Super juicy, sweet and cheap at $5 per pineapple! OMG yum!

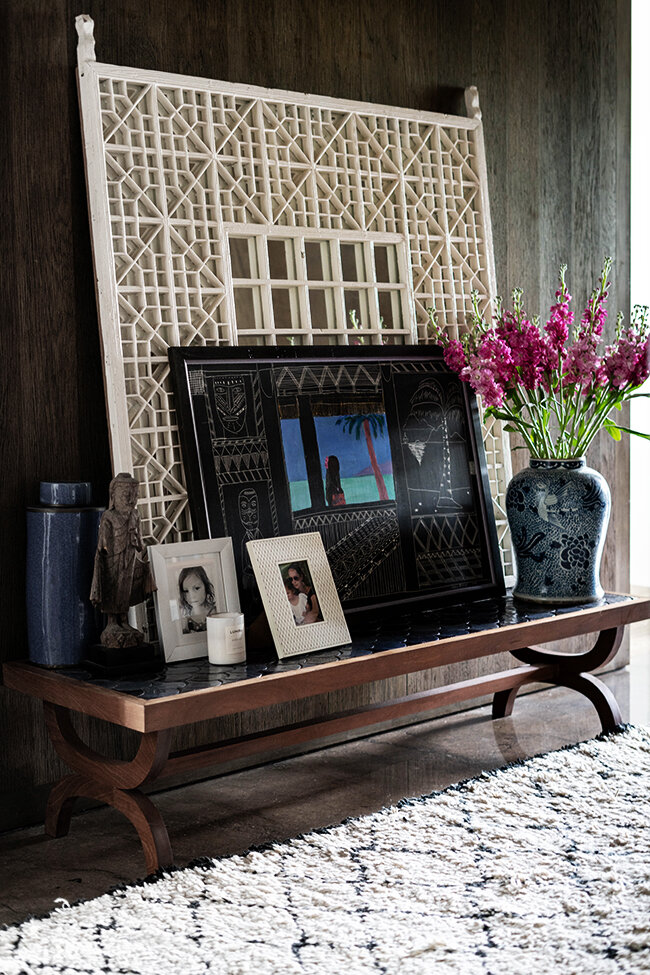
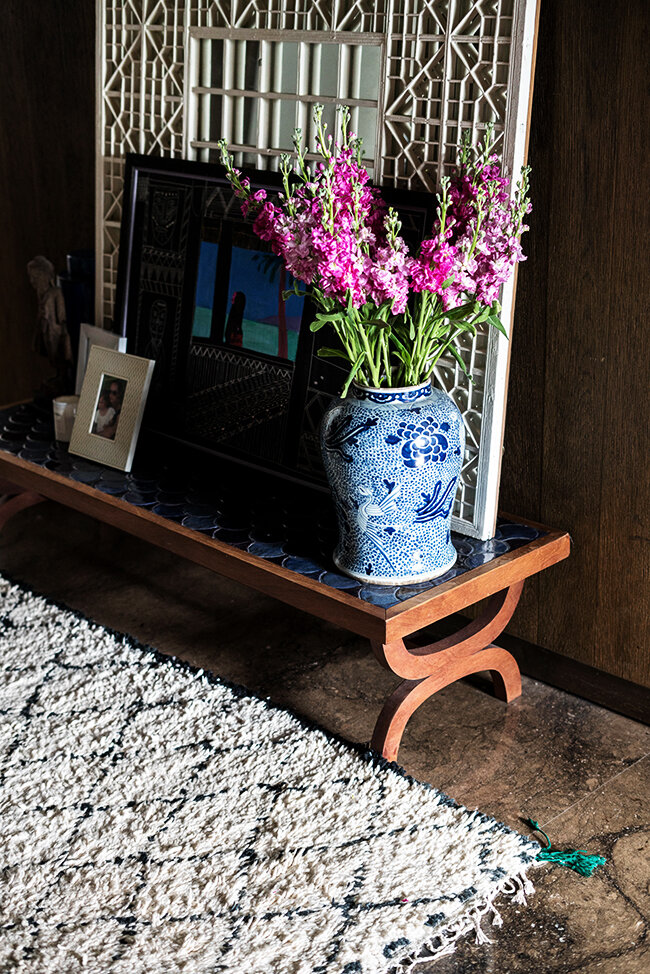
Arriving at the home of fashion stylist, Delphine Rethoret, is like entering a Balinese oasis. The setting is very much Singapore - a narrow residential street with homes filling their blocks, almost touching they are so close - the hustle and bustle of a busy shopping strip nearby and the sounds of a school yard ringing out across the street. But in amongst this typically busy residential neighbourhood lies a beautifully curated home hidden by a huge frangipani tree.
Step inside the high fence and you are greeted by a modern home clad in bamboo screening and surrounded by tropical foliage. The home feels tucked away and private and very far from the streetscape it belongs to. Delphine worked closely with an architect to design and oversee the building of the home so it is no surprise that it offers a true reflection of her personal and home style - a blend of bohemian, eclectic and classic simplicity. In this home she has created the perfect antidote to city life.


Delphine is a traveller at heart and left her native France at the conclusion of her studies. Her home reflects her travels and she has a knack for combining all of her different finds - there are African mud cloths alongside Morrocan cactus silk cushions; Asian furniture finds a home beside design classics and she combines Indian block printed napkins with French linen placemats on the table with a finesse that reveals her stylists eye. It is this ability to combine styles and keep everything feeling harmonious and relaxed that makes Delphine such a wonderful fashion (and home!) stylist.


What I love about Delphine’s home is that it exudes warmth and personality - and by not following interior trends Delphine has created a home that is authentic and timeless. It also helps that for Delphine and her family, Singapore is home. Having lived here for 18 years, this is where they intend to stay and the home they have built feels permanent.
At the entrance of the home the outdoor deck extends indoors and wrap-around louvered windows continue the outdoor/indoor design. A beautiful big daybed from Bali is matched with two mid century black canvas butterfly chairs.


At the rear of the home, Delphine designed an open plan kitchen and dining room that has a wonderful sunroom attached which provides a place for the kids to play and a casual table with benches for breakfast and snack times. There is also a small indoor courtyard with an Indian corn grinder table and lots of greenery.


Delphine’s fashion style is not unlike her home style - it is a mix of all the things she loves with a nod towards bohemian and it never feels fussy or over-thought. She wears high-street brands with high-end luxury and will finish off a look with a treasured vintage find. Her natural eye for aesthetics was snapped up early in her career when she was employed by high-end European fashion houses to seek out treasures and artisans in Asia - and send back inspiration of her finds for new designs in Europe. In recent years she has consulted on home and fashion styling and most recently, decided to dedicate her business, Atelier Jacqueline, to fashion.


At the top of the home lies Delphines home office. A relaxed space full of inspiration - pin boards lean against the wall and little trinkets adorn the space. There is also an impressive collection of magazines that span almost a whole wall! It is from here that Delphine works with me to produce the fashion content you see on the blog.


When mixing different styles try and include three objects relating to one style in the room and space them out so that you have an even distribution of style
Stick to a loose colour palette that will help to tie together your different styles
Search for unique objects on your travels and don’t be afraid to organise shipping to get things back to Singapore
Buy what you love and try to ignore interior trends (unless of course the trend is your inherent style)

I currently have this Lemon Olive Oil Rosemary cake on rotation. It’s like a lemon drizzle cake but even better and because it is made with olive oil and milk it is super moist and soft – even days later.
I stumbled across this cake when I was looking for recipes to make for the workshops at The Assembly Hall (if you attended one of our workshops in June, chances are you ate this cake!) I wanted something that was light and fragrant and suitable for the morning with a cup of tea or coffee and this one fits the bill perfectly. The combination of zingy lemon, earthy herby-ness of rosemary and a tangy glaze have made this cake my new go-to morning tea cake.


Recipe adapted from foodnetwork.com
The quantities listed makes enough for two cakes. I use one loaf tin that is 21 x 8 x 7cm and another slightly larger tin that is 21 x 10 x 10cm. The tangy glaze is also enough for two cakes.
2 cups of caster sugar
3 eggs
1 cup extra virgin olive oil*
2 cups of plain flour
1 tsp salt (I use Maldon sea salt slightly crushed in my fingers)
½ tsp bicarb of soda
½ tsp baking powder
1 ¼ cup milk
Juice of ½ lemon
2 tbsp lemon zest
1 tbsp rosemary, finely chopped
3 cups icing sugar
¼ cup lemon juice
1 tbsp lemon zest
1 tbsp rosemary, finely chopped
—
Preheat the oven to 180°C and grease and line your cake tins.
Beat together the sugar and eggs until pale and creamy. Gradually add the olive oil and beat until the olive oil is fully incorporated and emulsified.
In a separate bowl, combine the milk, lemon juice, lemon zest and chopped rosemary. And in another separate bowl, combine the flour, baking soda, bicarb of soda and salt.
Add a 1/3 of the flour mixture to the sugar and eggs and beat until incorporated. Follow this with ½ the milk mixture and beat until combined. Continue to alternatively add the flour and milk mixtures beating all the time until you have incorporated all the ingredients (you will start and finish with the flour mixture). The cake batter will be quite runny.
Pour into your prepared cake tins and bake in the oven for approximately 40-45 minutes (if like me you do one smaller and one larger cake then they will cook at slightly different times). Test that the cakes are cooked by inserting a cake skewer – it should come out clean when the cake is cooked (or you can press the top of your cake with your finger to see that it bounces back). When baking cakes I like to keep a general eye on them after the 30 minute mark (before then don’t ever open the oven) as ovens vary and cooking times can also be different based on the shape and size of your tin. So just keep an eye on them. Your cakes might take a little longer or shorter than this recommended time.
Once the cakes are cooled, remove from the tin and allow to cool completely on a rack. To make the glaze, combine the icing sugar, lemon juice, zest and chopped rosemary in a bowl and then drizzle over the cake (I just mix this glaze with a spoon – there is no need to whisk). The consistency of the glaze should be quite thick so it doesn’t totally slip and slide off your cake. I suggest putting the cake in the fridge to cool the glaze until you are ready to serve.
* I have made this cake with good fruity olive oil and ordinary light olive oil and I can’t detect any taste difference so I would not bother to use your expensive olive oil for this recipe)

Over the summer we had a French wedding to go to. It was all kinds of lovely as weddings usually are – the bride looked beautiful, the groom was handsome, everyone was in a happy friendly mood and the sun shone. Perfect. But this wedding had me whipping out my camera and photographing like a woman possessed – because it was quite simply the prettiest wedding I had ever been to. And what is more, it was all created by the wedding guests – there were no wedding specialists brought in to make the magic happen.
So I am sharing with you here all the beautiful details because they are clever and lovely and with a few tweaks here and there – totally do-able to recreate at home next time you are entertaining and want something simple and pretty. Think handpicked wild flowers, soft antique linen, mismatched chairs and a string of florals and greenery to hang above the table.


This year is whizzing by at such a rate and I always feel like once the summer holidays are over time goes into serious turbo charge mode until Christmas. I sat down to plan the September and October calendar for Lottie is Loving and The Assembly Hall earlier this week and there is barely a day (let alone) a week free (that’s if you don’t include the two weeks of holiday when we plan to return to Australia to see family and friends). Apart from that ;)


Finn recently had to design a survey, collect the data and represent it in a bar graph for his Maths homework. He chose to ask ‘what is your favourite meal of the day?’ He asked his friends, his Dad’s colleagues, family members and other Mums – I would say it was a fair cross section of the population and…drumroll please… breakfast was crowned the winner (with brunch coming in a close second).* So although it seems that breakfast is a bit of a favourite, how often do you open the pantry or fridge in the morning and feel uninspired? It’s a quick meal by necessity of the time of day and it needs to satisfy for the day ahead. Since finding this muesli recipe about 10 years ago I have forgone supermarket cereals in favour of this simple, tasty and (somewhat) healthy start to my day.
The original recipe has a few more ingredients including dried blueberries (which I could never find) and coconut flakes (which similarly I can not always find). So this is my pared back version. The great thing about making your own muesli is you can add whichever extra little bits you like. Make a batch of this simple muesli and then let family members choose their toppings – extra nuts, dried or fresh fruits or coconut. I have also doubled the quantities so that we only have to make this muesli once a week.
I like to eat it with some whole yoghurt and a splash of milk.

Recipe adapted from Bill’s Open Kitchen
6 cups of rolled oats
1 cup apple juice
4 tablespoons vegetable oil
1 cup raw almonds, roughly chopped
1 cup raw cashews
2 cups sunflower seeds
½ cup pumpkin seeds
¼ cup sesame seeds
Preheat oven to 160°C. Place all ingredients (except the cashews) in a large deep baking dish and stir to evenly coat in the juice and oil. Bake in the oven (periodically turn the muesli over while it is cooking so that it toasts evenly) until golden and crisp. (I have found over time that to get the muesli perfectly crisp without burning is a matter of keeping an eye on the almonds - once you see their white insides have browned, it’s time to take it out of the oven).
In a separate baking dish, toast the cashews. They will take less time than the rest of the muesli so it makes sense to separate them out - otherwise you will have some seriously bitter burnt nuts. Add them to the toasted muesli before storing.
That’s it! So easy. Keep stored in the pantry in an air tight container.


* For those of you interested, lunch came in last. Who’s going to vote for lunch? Lunch is always a pain in the neck unless there are leftovers in the fridge.


Earlier this week I had the absolute pleasure of hanging out with French food stylist Elodie Bellegarde at her home. Elodie and I have known each other for a couple of years but rarely find the time to meet so it was lovely to spend time with her, chatting about living away from our home countries, bringing up kids in a mixed nationality household - and of course, all things food, photography and styling.
Elodie has a Masters in Culinary Arts and is in demand for her food styling talent. Her beautiful instagram account @elodbelle is always one that makes me stop in my tracks and double tap a ‘like’. She is also a published cookbook author and runs Food Styling and Photography workshops in Singapore which always sell out. But more than this, she is a wonderful cook - so when I suggested a meet up, I also suggested she cook me something typically French - something she would enjoy with her family and that I hadn’t made before. So while I sipped a delicious coffee (pausing every now and then to take photos) Elodie chopped, sliced and diced and produced this wonderful rustic French galette for me to photograph and share with you here.


RECIPE : ELODIE BELLEGARDE. SERVES 4
Pastry
200g plain flour
100g spelt flour
a good pinch of salt
a good sprinkle of dried verbena leaves (or thyme, tarragon or oregano)
150g cold unsalted butter, cubed
a splash of iced water
sprinkle of semolina
Filling
2 small red onions
700 to 800g cherry tomatoes (you may wish to leave some still connected on the vine for presentation purposes)
1 tbsp balsamic vinegar
salt and pepper
olive oil
small knob of butter
good handful of basil
Method
Start with the pastry. In a large bowl, mix with your hands the flours, salt, verbena (or herbs). Rub the butter into the flour mix until it resembles breadcrumbs. I like to get my hands dirty, so I have a preference for doing it by hand but if it isn't your thing, place these same ingredients in a food mixer and mix until breadcrumbs form. Add some iced water, a little bit at a time until the dough just comes together - it should come together without being soggy or too crumbly. Give it a couple of kneads and form a ball. Refrigerate, covered, for 30 minutes while you get on with the tomato filling.
Finely slice the onions and half or quarter (depending on size) the tomatoes. Heat a medium saucepan over low heat and with a couple tablespoons of olive oil and a knob of butter. Add the onions and cook for 3 to 4 minutes until the onions start to soften. Add the tomatoes and cook for a further 5 minutes. Add the balsamic vinegar, season to taste, stir and partly cover the saucepan. Leave to simmer for a good 10 minutes. Turn off the hob, uncover the pan. If you find the filling too watery, cook for a further 3 to 5 minutes, uncovered on high heat so it thickens a little. You should get a mix of crushed tomatoes and some juice. Tear the basil and add to the filling.
Preheat the oven to 180ºC. Take the pastry out of the fridge and roll it to a thickness of about 1/2cm. It doesn't need to be even or perfect. Sprinkle the pastry with a thin layer of semolina. This will prevent the bottom of the galette from being soggy and soft. Cover the pastry with the tomato filling leaving about 3 to 5 cm around the edge of the pastry to fold over the filling. Pinch, overlap and fold the sides of the pastry. The galette is rustic and simple so don't look for perfection here.
Bake in the preheated oven for 20 to 25 mins or until the sides of the galette are turning a pale shade of brown. Serve with a sharply dressed salad for a light lunch or dinner.

Figure out your background. Here, Elodie used a tile to provide a neutral back drop that had a rustic feel - connecting with the style of the dish.
Decide how you will be shooting the dish as this will inform your styling choices. Because the galette is flat, we knew that most (if not all) of the shots would be taken from above so chose the plates and accessories accordingly.
Find some styling items that will help to tell the story of the dish - a napkin, a knife, some cutlery and plates - these all help to tell the story of food that will be shared with others in a relaxed setting.
Add some interest and colour with ingredients that you have used in the dish. To reference the ingredients used in the dish Elodie placed fresh basil and a little pot with the left over tomato juices from the galette filling in the styling.
Once you have your styling items figured out, play around with their placement. To do this, you must look through the camera. What looks right to the naked eye might not translate when you look through the lens. Keep looking through the camera and move things in place accordingly - you may need to add things in or take things out.


I took a total of 99 images for this article using the Sony A7R III fitted with a 50mm 1:4 lens. ISO 800 / shutter speed varied / f between 2 and 3.2. Editing was done in lightroom and finished in photoshop.

If you are interested in learning food styling and photography from Elodie she has just one spot left for her ‘One Dark’ workshop and one space left for her ‘One Bright’ workshop. And there are 2 spaces remaining for the ‘Action Shots’ workshop - so you might want to get in quick if you are interested! If you would like to learn more, visit: http://www.elodiebellegarde.com/workshops
Until next time, happy home cooking.


When I was a teenager I knew a boy called Gonna. I didn’t know his actual name because everyone just called him Gonna. When I asked his friend one day why that was his nickname, his friend replied “because he’s always saying “he’s gonna do this…” and “he’s gonna do that” but he never does so we call him Gonna. The name stuck and now I’m thinking this could be my new nickname when it comes to the styling of our home, because for nearly two years now I’ve been saying I’m “going to” do the living room. It’s not even like I need to do a huge amount - it really just comes down to some new sofas and a rug and a bit of reupholstering. So why has it taken me this long to figure out what we should do? In fairness I decided on the rug a year ago. That’s right. A. Year. Ago. But I still haven’t bought it. Partly it’s that I get busy with work and other people’s homes and then can’t be bothered to do our own - which basically amounts to laziness - and partly it’s because I love a few different styles and find myself being swayed in different directions depending on the day.
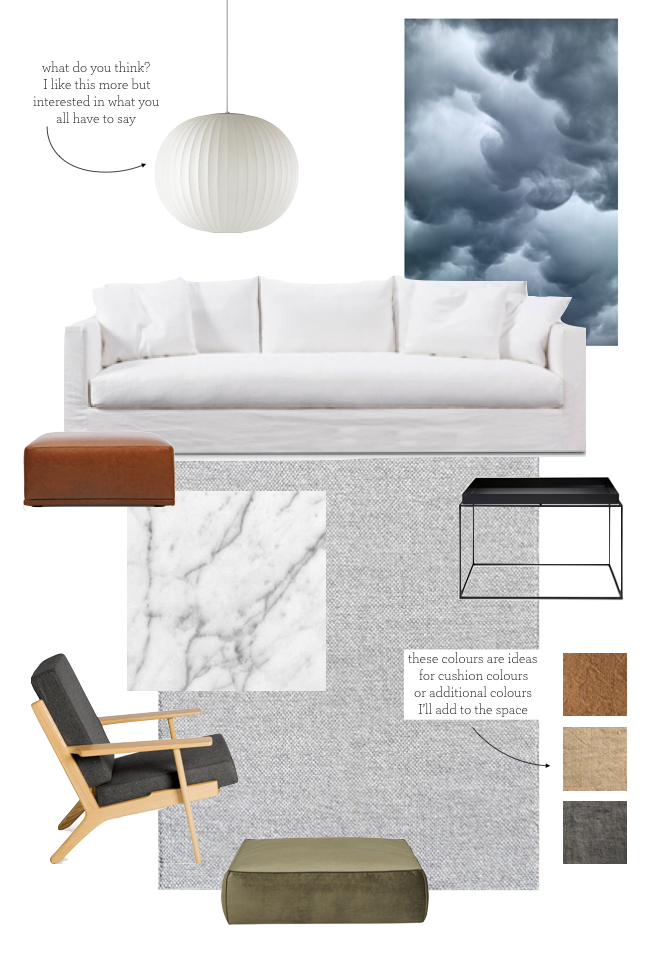
So, with a new year underway and no good excuse to not just make some decisions and get on with it (and some small measure of fear that friends are going to start calling me ‘Gonna’), I have finally pulled together a mood board for approval by the home committee.
It’s out with the charcoal sofas and the grey and white (now decidedly grey and beige) chevron rug. And in with a clean palette of white, earthy tones, a touch of grey and a new artwork piece (at the moment we have two Cameron Bloom artworks on the wall which I adore so they might stay in the living room and move to a different position - or they might move to a new room…we’ll see - artworks always have to be figured out last). And the existing cushions will also find a new home somewhere else.
Lots of pieces will stay - the marble coffee table, the black Hay tray table, the black marble Bethan Grey side table, as well as the Armadillo & Co petunia rug, the Joshua Yeldham artwork, the Moller bench and the Martine Emdur artwork - these are all keepers. Other pieces are staying but being updated - the two square ottomans will be recovered (one in leather and one in velvet) and my favourite Hans Wegner chair also needs a reupholster (it still has the original mid-century fabric and is looking decidedly gross).
The pendant light. This one I’m not sure about. I think I would like to change it but I’m not sure I’ll get it through the committee (something along the lines of “what’s wrong with the one that’s there?”). Fair point. Nothing is wrong with it as such but I think I’d like something less…Hamptons-meets-tropical vibe. Take a look below at the two mood boards and tell me which you prefer…(I understand that for most people this difference will be so minimal as to not be worth bothering to respond to, but humour me…)

Start by considering what can stay - what do you love and what is in good condition? Hopefully you have some good classic pieces that can stay and fit with any new ideas you have.
Take a look at what you can keep and refresh. If you have furniture items that are still in good condition but are just looking a little tired, consider reupholstering them instead of buying new. If the furniture item is timber and you would like to give it a new look, consider repainting it professionally. Don’t paint it yourself. A professional paint job will make all the difference - trust me (you don’t want this to be BBC’s Changing Rooms circa 1996 where your neighbour takes a can of turqouise paint - at the direction of Lawrence Llewelyn-Bowen - and transforms a perfectly good piece of furniture into something ugly and cheap looking). Last word on this - hire professionals.
Once you have a shortlist of furniture items to keep / and or refresh - start considering what you need new.
Gather ideas from Pinterest and Instagram and start refining your style direction
Then create a mood board. I use Keynote to create simple mood boards like the ones above. You can also use Powerpoint. Both are pretty straightforward to navigate.
If you would like to come and learn how to style your home, I am teaching our Styling the Home workshop at The Assembly Hall in March - to read more or book your spot, head to the website.
Now…woven pendant or white George Nelson bubble pendant…?

Over the Christmas break, we were lucky enough to spend a long weekend in Tasmania at Piermont Retreat near Swansea. Located on a private beach near the Freycinet National Park, Piermont Retreat is a beautiful quiet and low key place to stay - with a simply stunning restaurant! Recently designed by Hecker Guthrie, the interiors have a distinct Scandinavian feel with a cool colour palette of greys and pale timbers. I fell madly in love with this space and one morning escaped the family to spend a leisurely morning sipping coffee in the lounge area absorbing and dissecting all the design details for future interior inspiration.
Prior to this recent holiday I felt a bit stuck creatively . I had stopped taking photos and was feeling luck lustre around styling and photography. There is something to be said for getting out of your home environment and travelling to find a new spark of inspiration and joy - which is exactly what happened when we arrived in Tasmania. I wanted to capture it all and found myself delving back into the world of interior styling with renewed enthusiasm.


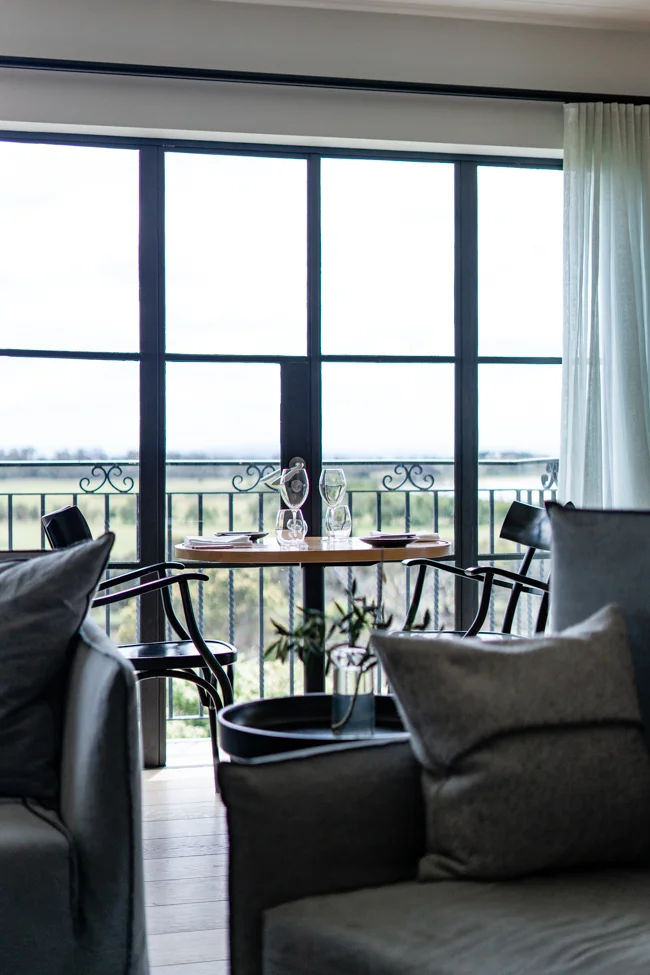
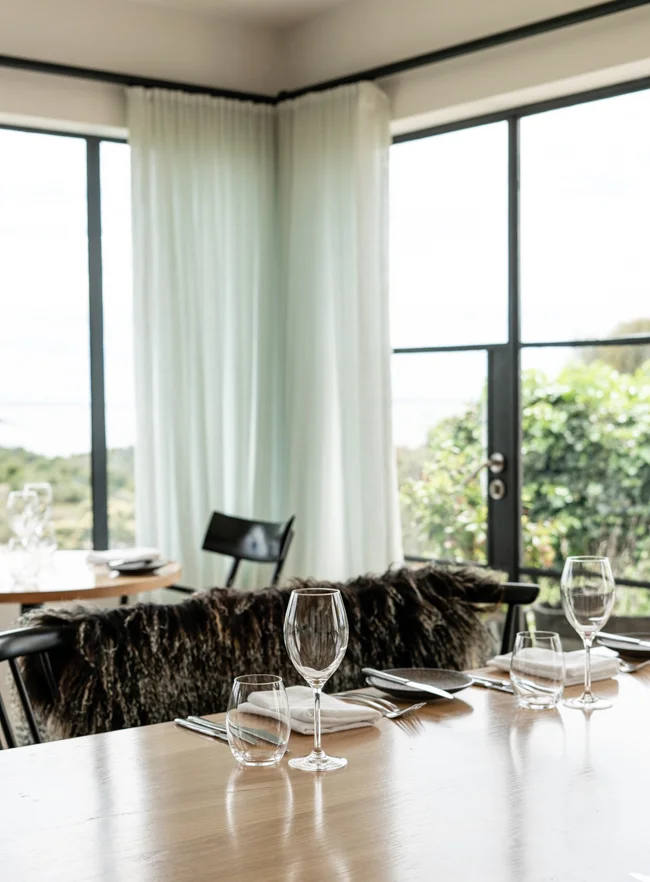


Located on the East Coast of Tasmania, Piermont Retreat is located just outside the town of Swansea. It sits on a private beach with unspoilt views across Great Oyster Bay. The Freycinet National Park and beautiful wineries are only a short drive away. Visit their website for more information.


Wherever you travelled over the Christmas break, I hope you had a lovely time with friends and family and have arrived back to everyday life feeling refreshed and ready for a great 2019!


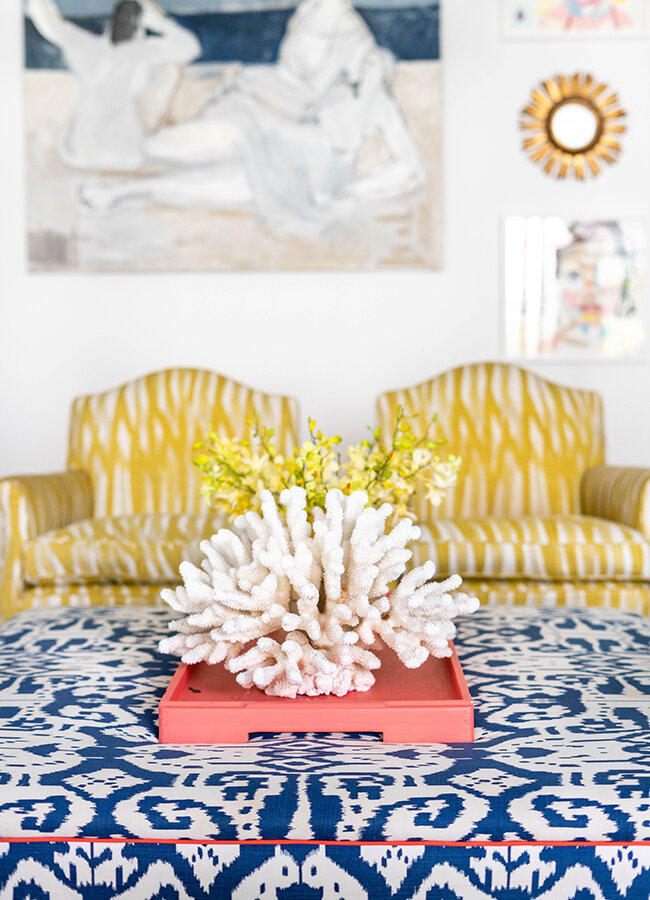
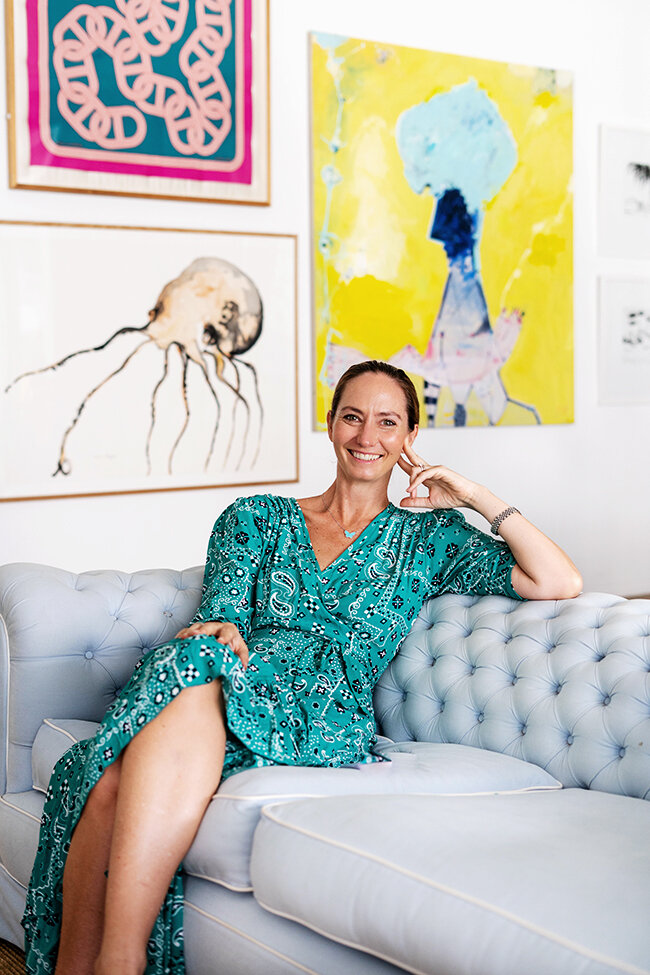
Step inside the stylish home of Singapore based photographer, Clare Barker Wells. Better known for her beautiful family photography, here Clare is showing a lesser known talent - her ability to style a modern apartment with effortless eclectic style.
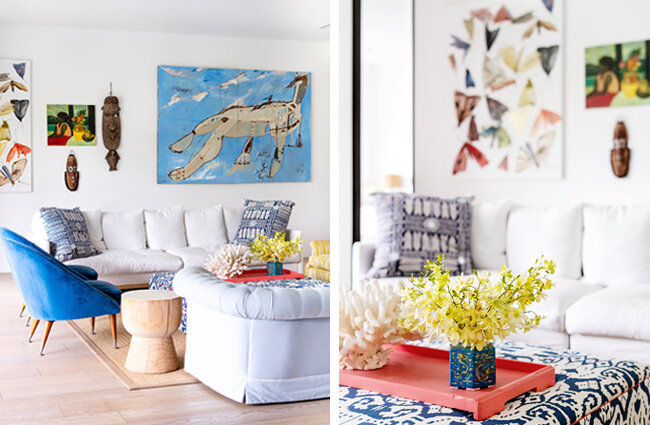
Located in Sentosa, the apartment has been filled with a clever mix of furniture and homeware items. It is a home bursting with personality - nothing feels over thought and there is an ease and comfort to the styling. A home that combines a high-low strategy for interior styling (combining one-off more expensive items with affordable pieces) always feel interesting and Clare has pulled this interior styling strategy off with success, sourcing beautiful vintage items to add character and charm to the home.
In the living room a mid century Danish side table sits next to an Ikea Stocksund sofa which has been recovered in pink linen to give it a high-end feel. Rather than play it safe with the cushions, Clare has opted for deep golden yellow velvet, patterned floral and geometric navy cushions. On paper this might sound like a chaotic combination but the effect is authentic and stylish.


Clare has used the entrance and hallway area to showcase some of her photography alongside stacks of her favourite novels. It fills the space with colour and the book stacks almost feel sculptural in nature.


*TIP: IF DISPLAYING BOOKS LIKE THIS, KEEP EACH STACK THE SAME HEIGHT AND SPACE THEM OUT EVENLY SO THAT IT FEELS PURPOSEFUL RATHER THAN CLUTTERED
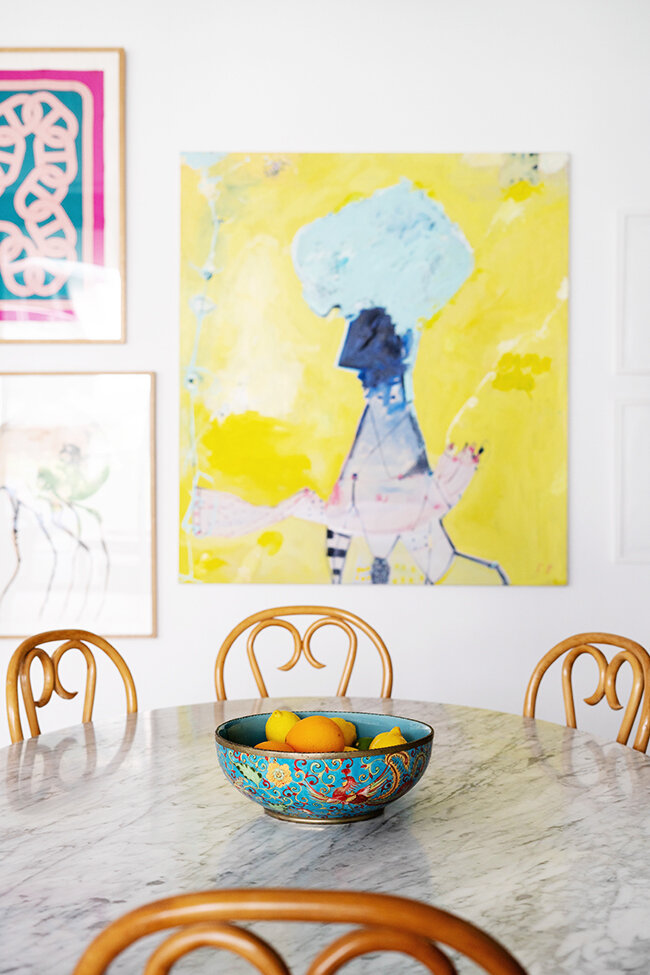
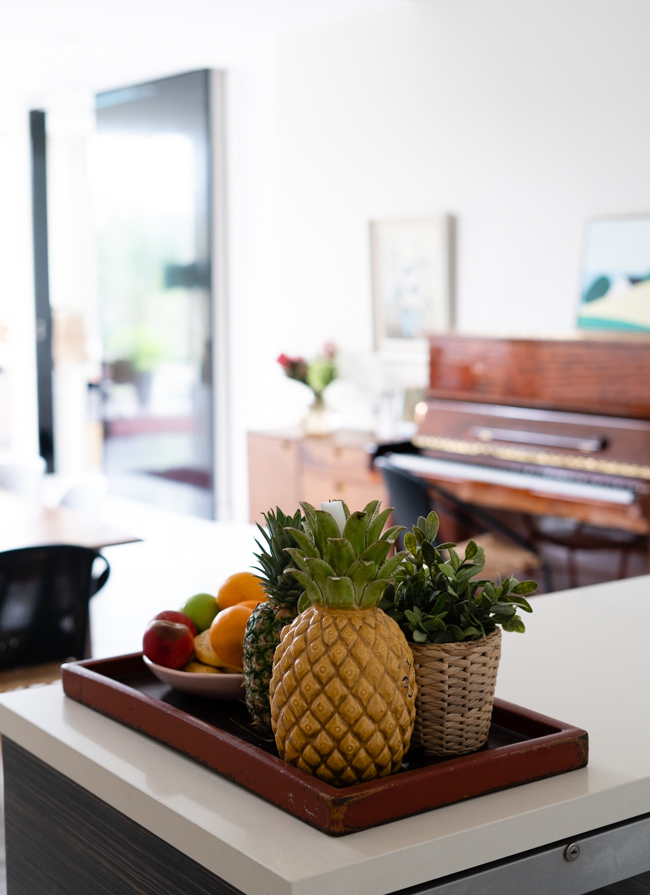
The open plan dining area features a vintage map of the region. The dining table is mid-century teak and Clare has used a contemporary standing lamp to fill the corner of the space. Facing the dining area is a beautiful upright piano, complete with stickers on the notes for little hands still learning.
Clare and her husband have sourced a variety of art for their home often picked up from second hand shops - some of which have proven to be excellent junk shop finds now worth far more than they paid. I strongly believe that great art can come from anywhere and price should not be an indicator of whether the art is right for you and your home - if you love it, buy it. Whether it comes from a junk shop or a high-end gallery.


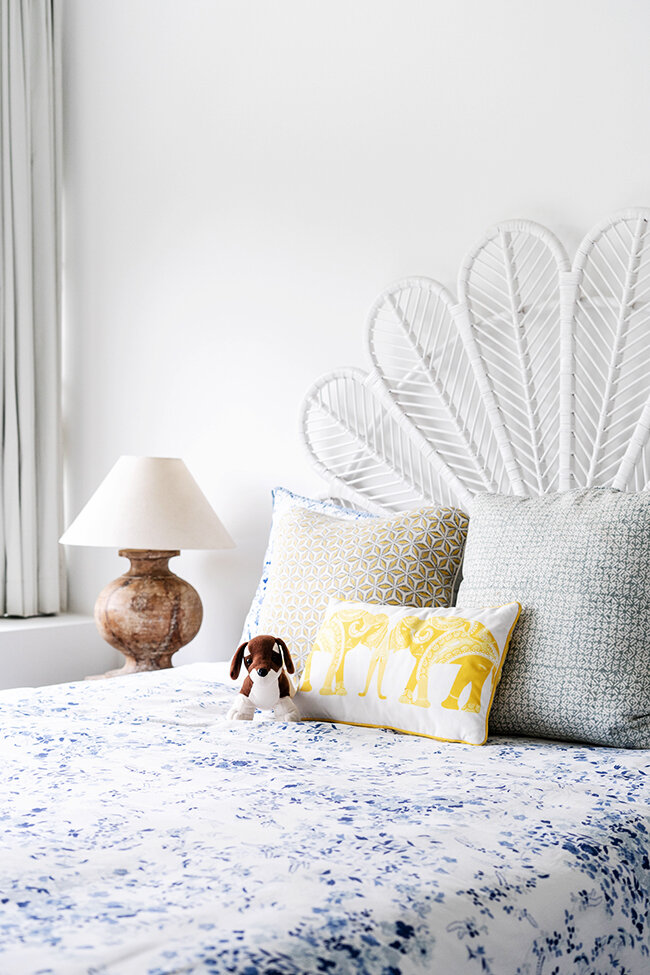
The master bedroom is calm and cosy with a pastel colour palette as its base. A pair of vintage teak chest of drawers add an element of masculine to the otherwise feminine space and I particularly love the mis-matched bedside lamps which add interest and personality. Clare has a collection of blue and white ceramic ginger jars resting on the window sill and a small desk in the corner where she can grab some time away from her little ones to work from home.


Clare’s sense of style carries through to her children’s bedrooms. Her daughter’s room has a vintage feel and I love the use of the deep red oriental rug - it is an unexpected choice for a girls room and I love how it anchors the space and lends weight to the whimsical elements.
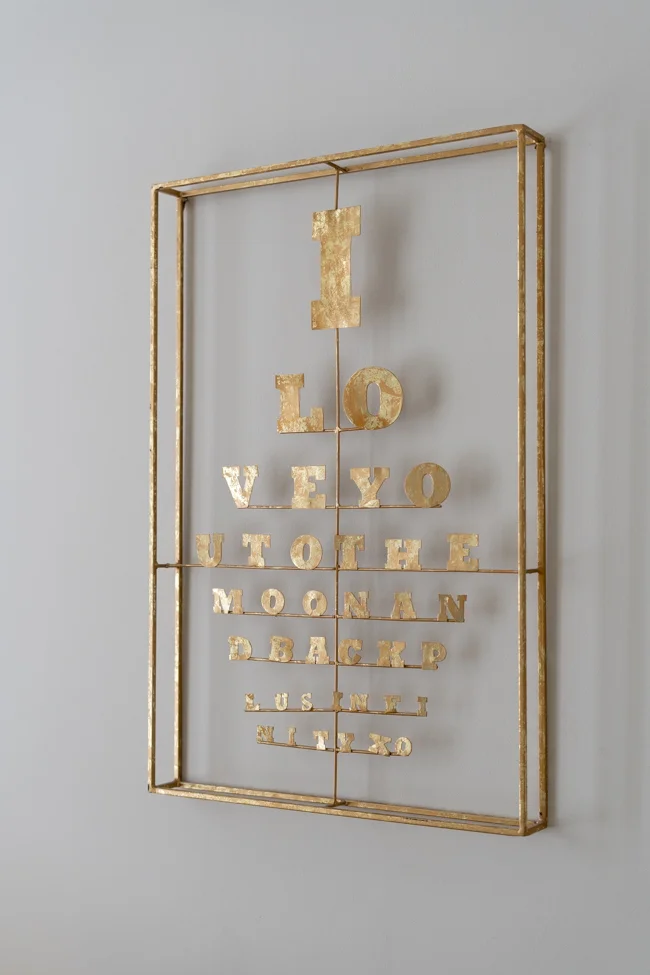
Her son’s room is perfectly age appropriate with colourful elements and a simple design for a little one who is still sleeping in a cot. The beautiful hand-beaten gold quote art is an eye catching element to the room.


Mix pattern and colour to create interest and personality
Re-upholster affordable sofas in beautiful fabric to give them a luxe feel
Spend and splurge - combine affordable pieces with a couple of high-end or one-off pieces to give your home a sense of personality
Use books and art work to add colour to your space
Combine styles of furniture
Shop for a variety of art by looking in second hand shops
Let some of your art rest against pieces of furniture - not everything needs to be put up on a wall


This lemony salad is full of goodness and is filling enough to eat on it’s own. Feel free to substitute or add to this recipe as it could really be adapted to suit whatever you have in terms of fresh produce. The secret of this recipe for me is in finely shredding the kale and scrunching it up with the dressing to soften it. Recipe adapted from The Minimalist Baker
1 x large bunch of kale, finely sliced and large stems removed
Squeeze of lemon juice
1 tbsp olive oil
1 tbsp maple syrup
1 x handful of toasted pine nuts
Salt and pepper to taste
1 x can of white or butter beans
1 x lebanese cucumber, diced
1 x avocado, diced
½ lemon juiced
1 tbsp olive oil
1 tbsp fresh parsley, chopped
salt and pepper
2 cups of bread, cubed (I used a sourdough spelt loaf)
¼ cup olive oil
salt and pepper
1/3 cup light tahini
1 ½ lemons, juiced
1-2 tbsp maple syrup
salt and pepper
hot water to thin
Preheat the oven to 160°C and mix your cubed bread with the olive oil and seasoning and tip on to a baking tray. Bake in the oven until golden and crispy turning every now and then so that they brown evenly. Set aside to cool slightly while you make the salad.
In a small bowl, combine the drained beans, avocado and cucumber with the lemon juice, olive oil, parsley and seasoning and toss to combine. Set aside.
Next, make the dressing for the kale by whisking the olive oil, lemon juice, maple syrup and seasoning together. Add to the kale and scrunch to combine and soften the kale. Toast the pine nuts in a dry frypan and set aside.
Make the tahini dressing by whisking all the ingredients together, adding enough hot water to thin the consistency to your liking.
When you are ready to eat, assemble the salad in a large bowl. To the dressed kale add the white bean mixture and croutons. Top with the toasted pine nuts and drizzle with a little tahini dressing. Serve the additional tahini dressing on the side. (Only add the tahini dressing and croutons when you are ready to eat, otherwise it all gets a little soggy).


I have become quite fixated recently with Moroccan rugs – and specifically rugs from the Boujad tribe. I travelled to Morocco many years ago and it still remains one of my favourite destinations. While we were there we hired a car and drove from Marrakesh into the Atlas Mountains, staying along the way at a variety of amazing Riads in the small towns that dot the valleys and mountains. We eventually made our way to Essaouira on the Coast before returning once more to Marrakesh. It was an amazing trip and my only regret is that I didn’t raid the souks more for rugs and other trinkets. The Boujad style of Moroccan rugs that I now covet come from this central region that we travelled through.
Now that we are in the new house, I am on the hunt for a Boujad rug for an area of the dining room. I love an all white interior with a pop of colour and our new house offers the opportunity for that look given the all white walls and floor. So I thought I would share with you today the suppliers that I am browsing to find my perfect rug.


IMAGE CREDITS: TIGMI TRADING | LOOM & FIELD | INTERIORSBYSTUDIOM
For original handwoven rugs imported from Morocco try:
Semikah Textiles
Kulchi
Tigmi Trading
Thorn & Burrow
Loom & Field
For Moroccan inspired designs that are machine made and customisable by size, try:
If you are interested to see the other inspirations I am seeking for the new house, join me over on my pinterest boards.

When you live in rented accommodation there is a limit to what you can do with some of your spaces. Well, for me there is anyway. I live in an old home and the bathrooms (and kitchen) were probably last updated in the 1980’s. We have other quirks with living in an old home (that is owned by the Government) like none of our electrical wires are hidden in the walls so we have conduit running up and down the corners of our rooms and across the ceiling to connect powerpoints, lights, fans and any other electrical items. There is no gas connected to the house so we have a gas cylinder in our kitchen so that we can use the oven. We also live with snakes (actually our neighbours seem to be living with all the snakes…I’m not sure why they haven’t come to visit us – the snakes that is, not the neighbours!) not to mention frogs (who like to snuggle inside our shoes if left outside – you only have to put your foot inside a sneaker once and feel a squashy slimey frog touch your foot to always check before you put on a shoe!) But even with all these things, I feel it’s a small price to pay for the wonderful history of such a home.
But on to the bathrooms…they are not modern. And I’m not going to renovate them. So this is what I did instead. I kept it simple and tried to make it look as nice as I could on as small a budget as possible. I bought a shelving unit from Ikea and replaced the original mirror with this simple one from Ikea, a shower curtain online and then accessorised with some beautiful soap, turkish hand towels and some orchids in a modern pot. Sometimes all you need is some small touches to give a room a refresh.


